

Your boss walks into your office and says “Send out the projections report on the last day of each month to everyone working on this project except for Bob. Bob needs to get his own version of the report on the first day of each month.” You respectfully nod in acquiescence and while setting up reminders in your already overloaded calendar you think to yourself, “why isn’t there an app for this?” Well luckily for you there are several and I will introduce you to one of my personal favorites, remiCrystal.
So what is remiCrystal? This handy little program was created with the purpose of scheduling and automatically distributing dynamic Crystal Reports, Microsoft Excel Spreadsheets, and SSRS Reports to multiple recipients. Once a Task is created remiCrystal will run individual reports and send them to any number of Targets within minutes. (This will surely prove to be a relief to your burdened calendar!) remiCrystal’s other notable features include a user-friendly interface, versatility, stability, extensive multi-tasking capabilities, 256-bit encryption, and the assistance of an amazing support staff. This report automation application is quite a handy tool in the world of Business Intelligence.
How does it work? I believe the best way to answer this question is with a short demonstration. Let’s start by creating a ‘Basic Task’ for sending out a Crystal Report on the last Friday of the month.
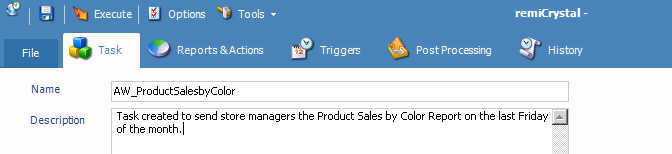
STEP 1: Once you start remiCrystal and click on ‘Create Basic Task’, you will be asked to enter a name and description for your task. I highly recommend including any recipient names, report titles and automation schedules in the description to avoid possible confusion in the future.
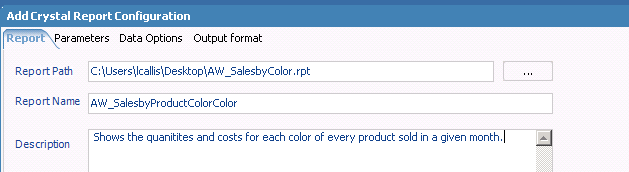
STEP 2: After you save your task you will need to add your Crystal Report. Start by clicking on the green plus sign in the bottom left corner of the ‘Reports & Actions’ tab. Choosing a report will cause the configuration window to popup. In the report tab, ensure that you have the correct report path and report name. Once again I truly recommend adding a clear description to reduce any future confusion. As soon as everything is in order, it is on to the ‘Parameters’ tab.
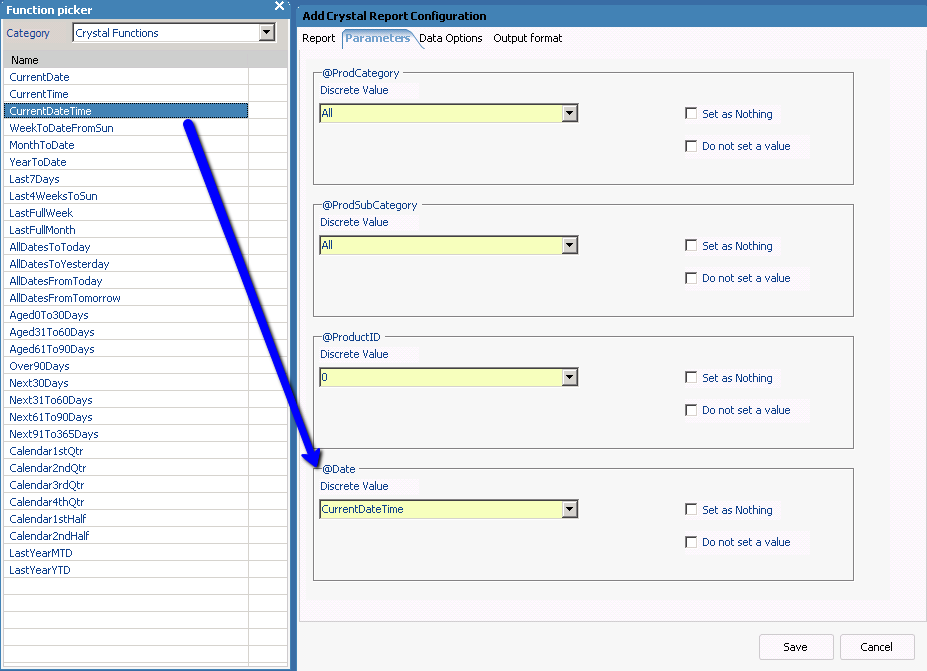
STEP 3: After adding your Crystal Report, remiCrystal kindly adds all the report’s parameters for you and places them in the tab of the same name. All you have to do is enter the desired values for your parameters. In this example, populate the first 3 parameters so that the report pulls in everything for our desired sales month. But what about the month itself? The report should be limited to all transactions made within the current month. Luckily remiCrystal will help with this as well. On the left of the configuration window there is a ‘Function picker.’ By clicking and dragging the ‘CurrentDateTime’ function into the parameter input box, the program will get the current date and time and automatically set the parameter to that value each time the task is executed. Now on to the next tab.
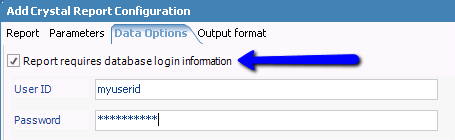
STEP 4: The ‘Data Options’ tab is important for reports driven by databases that can only be accessed upon the entering of valid user names and passwords. In order to enter the necessary credentials, check the box next to ‘Report requires database log-in information’.
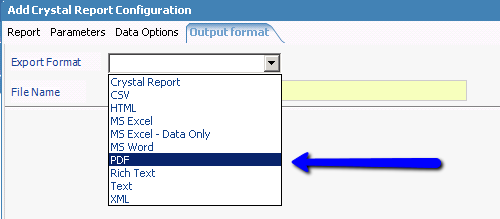
STEP 5: The final configuration tab allows you to choose the output format for the report. Select PDF so recipients can easily open the attachment from their mobile devices. Remember to click save once you are ready to move on.
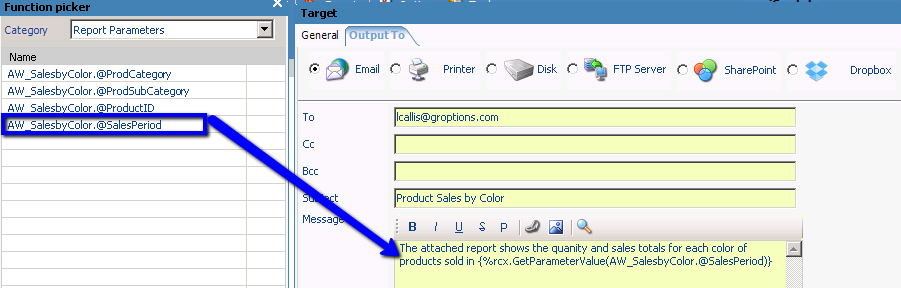
STEP 6: Now it is time to set up the report’s targets. Once on the ‘Targets’ tab, click on the green plus sign in the lower left hand corner. As the target configuration window pops up be sure to name the target and provide a brief description of where the report is to be sent. Now head over to the ‘Output to’ tab. This is where you tell remiCrystal where to send the report. As you can see from the screenshot below, you have many destinations from which to choose. You will be sending an email to your sales managers so this target will be set up to do just that. The report will be attached to the email as a PDF so a clear subject and message is advised. To provide further details about the attachment we can even show the sales period by changing the category to ‘Report Parameters’ in the function picker then dragging the parameter into the message body.
**Note: Multiple targets can be set for each task created. Simply click the green plus and create another one!
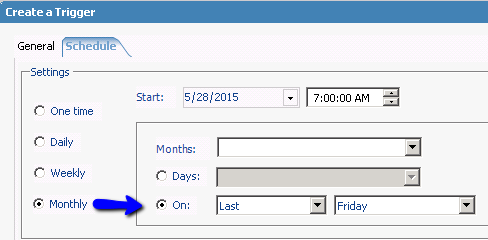
STEP 7: Once you set up the report’s targets it is time to create a trigger. Click on the green plus on the ‘Triggers’ tab and the trigger configuration window appears. The general tab is where you name and describe your trigger as well as enter your user IDs and passwords but the real magic happens on the ‘Schedule’ tab. The creators of remiCrystal provide a myriad of scheduling options. This particular report should be scheduled to go out on the last Friday of every month. Now the only things left to do are save then sit back and relax, knowing your workload just became a bit lighter.
Where can I learn more? I showed you the very basic capabilities of this infinitely helpful application. It has proven, time and again, to be a great asset to those of us working in the business intelligence field. To learn more about remiCrystal, request a demo, or review pricing, visit their website at www.remiware.com. Feel free to post any questions or comments you may have concerning remiCrystal or report automation. I can also be contacted via email at Bill.Wagnon@SelectViewData.com if you have any further questions about report distribution or would like additional assistance with your business intelligence needs.